PROTECTION GROUPS - DYNAMIC ASSOCIATION WITH RULES
Rules are used to configure dynamic association of VM’s with Protection group. Rules can be used to determine which virtual machines and containers will be protected by the group in addition to any objects that have been manually selected for inclusion. When creating or editing a VMware protection group, enabling the Dynamic association option for the group allows you to assign a rule. We can either use the NMC NetWorker administration window or the NetWorker management web user interface to create and assign rules to a group.
In order to support the dynamic selection of VMware objects based on the user-defined rules created in NMC, we use the tags in VSphere. Tags allow you to attach metadata to the objects in the vSphere inventory to make these objects easier to sort and search. Tags are supported in vSphere version 6.5 and later. When we create a tag in vSphere the tag can be assigned to a category in order to group related tags together. When defining a category, we can also specify the object types the tags will be applied to, and whether more than one tag in the category can be applied to an object. The vSphere web client displays any tags that have been created for the vCenter under the tags and Custom Attributes in the left pane.
Alright let's go look at how to create and use rules resources in NetWorker.
First lets go to the vCenter to see how we can set up tags. Login into the vCenter and click onMenu and select Tags & Custom Attributes

You need to first create a category before you create a Tag. To do this, on the Tags & Custom Attributes and then select Categories. Click on the +.
Give an appropriate Category name and select the rest of the attributes. If this tag is for backup of Virtual machines then its best to select the Associable Object Types as
Virtual Machine. The Tags Per Object determines if a tag an object with the tag from the category can have multiple tags assigned to it or not.

Once you have the category created you are ready to create a Tag.
For this just click on the tag in the “Tags & Custom Attributes” page.
And then click on the + to get the screen in the image below.
Put in an appropriate name and description and select the appropriate category.
Then click on OK. You can create how many categories and tags that you think you will need.

Now it's time to assign the tags that you have created to the VMware objects, in our case they are virtual machines.
So on the vCenter go to the VM’s and Templates to find the list of the Vm’s on the respective vCenter.
Right click on the VM instance in the left page to get all the options available.
And in that list select Tags & Custom Attributes and then Assign Tag.

This will bring up a window with all the tags available to the object - Virtual Machines. Select the tag and click on ASSIGN

You will be able to see the tags assigned to a VM under the Summary page under the section Tags.
Now that is all you need to do on the vCenter.
Remember as a backup administrator the tasks upto the step here would generally not be your responsibility,
this is just to make you aware of how this is done.

Now let's go to the NMC NetWorker administration window and go to the Protection section. You will find the Rules in the left hand pane of this page.
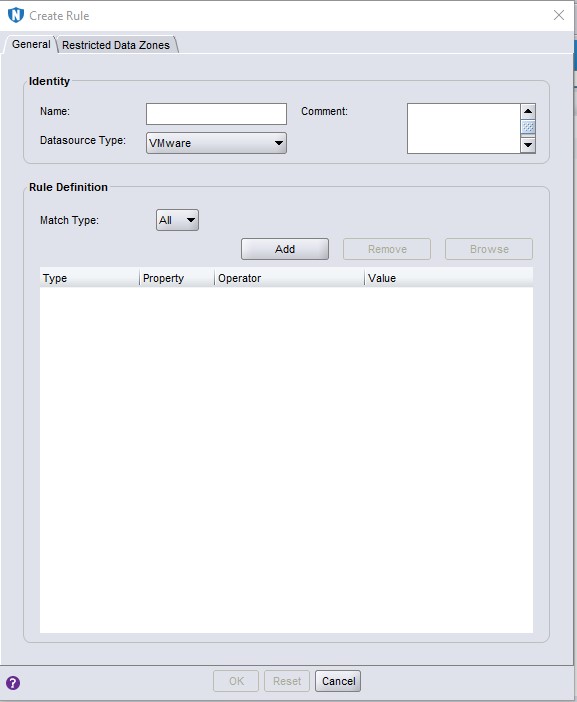
To create a new Rule, right click on the right pane after selecting the Rules object in the left pane. This will bring up the window to create a new rule.

Below table shows the different parameters that you can set on the rules resource and what each parameter means.
| Parameter | Description |
|---|---|
| Identity | Enables you to define the properties of the Rules resource |
| Name | Specifies the name of the rule. |
| Comment | Specifies a user provided description of this Rule. |
| Datasource Type | Defines the types of objects to be specified in the definitions, such as VMware. |
| Rule Definition | This section contains a match type which can have values Any or All, followed by an editable table where entries can be added and removed. |
| Type | The VMware object type. Available selections include VM, VApp, VM Folder, Datacenter, Host/Cluster and Resource Pool. |
| Properties | The object type properties that the rule uses to determine a match. You can define the rule to match based on the object's name, path or tag . |
| Operator | Uses the object type properties to further define how a match is made. Available selections include Equals, DoesNotEqual, Contains, DoesNotContain, StartsWith, DoesNotStartWith, EndsWith, DoesNotEndWith and Regular expression. |
| Browse | In the Property column's drop-down, if tag is selected then click Browse. This will list all the categories and tags that have been created on the vCenter. |
| Value | Enter value for the rule creation on which the operator is executed. |
To configure a new rule, put in an appropriate name and comments. Select the Datasource type as VMware.
Under the Rule Definition, we have drop down for the Match type parameter with 2 selection options.
All- This is similar to an AND operator in a conditional statement, where all the conditions in the rule table should be met by a VMware object to be selected.Any- This is similar to using OR operator in a conditional statement, where any one of the conditions in the rule table should be met by a VMware object to be selected.

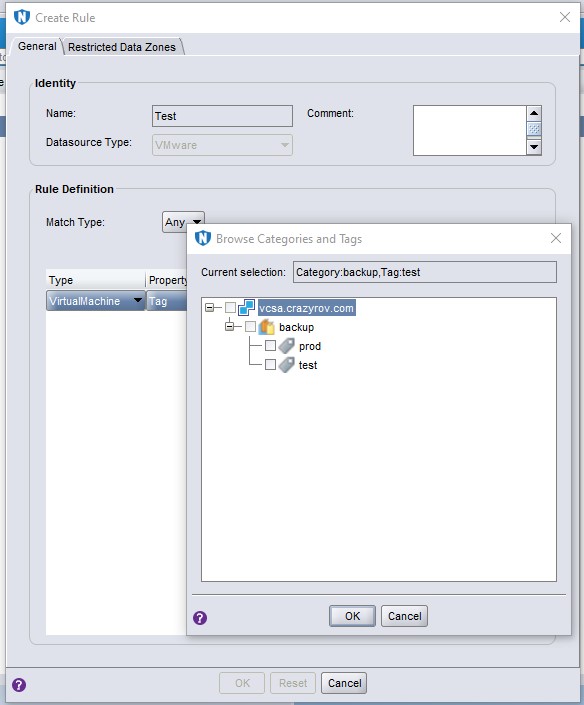
Now click on Add to start adding the rules. Select the Type as VirtualMachine, Property as Tag and operator as Equals. This selection in short means we are trying to match a tag that is assigned to a Virtual machine in vCenter to the value in the last cell.
If you want to create a rule based on VM name as defined in the vCenter use the Property as Name and you can select an appropriate operator and also put in an appropriate value.

To select the category and tag, click on Browse on the same row as the Add button. This will give you a new pop up with the available categories and the tags under each category.

Once selected you rules should look similar to the screenshot below.

Now to use this rule, let's create a Protection group for VMware.
Right click on the Groups under the Protection section of the NMC’s NetWorker administrator window and select New.
Put in the usual details like Name and Description. Select the Group Type as VMware.
Make sure you have the Dynamic Association option checked.
Let the appropriate vCenter from the dropdown on the vCenter field.
Now on the bottom of the windows in the drop down beside the field Rules, select the Rule definition that you want to apply to the current protection group.
Once done you can review to see how your rule behaves by clicking on the Preview All Virtual Machines.
And you should see something similar to the screenshot below. The VM’s that are switched off might not show up.

Thank you for visting www.crazyrov.com, you can also check out my YouTube channel - crazyRov Studios for Data protection and cloud related technical videos.


